Lifeboatboy
Member
So many expert people on here have helped me over the years with ideas, advice and information, I'm slightly hesitant about posting this, but here's my attempt at giving something back to this forum. If you just want a pictorial version it's on Pinterest. I hope it’s entertaining, and I warmly welcome both criticism and suggestions.
Background:
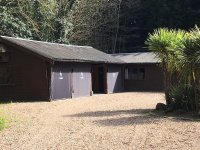
2 years ago I got into a minor contretemps whilst in East Africa, resulting in me being repatriated to the UK with a few lumps and bumps, and a head filled with PTSD. I decided to put the recuperation time to some semblance of good use. Here’s where I was storing 4 cars. It’s sacrilege, I know.

I took a few photos, loaded them into PowerPoint, and began playing around with colours, styles and ideas. I used Pinterest for inspiration, ScrewFix/ToolStation for encouragement and Club Scuderia for education. YouTube provided enough b/s to make me feel like I knew what I was doing, and Amazon reassured me it could help me buy everything I needed – apparently skill and experience were optional.
Just a suggestion, but here’s a really simple way to start ‘designing’ your garage using nothing more than your phone and PowerPoint. There are tools, stencils and templates out there, but they all failed me, and because I’m familiar with it, PowerPoint was just easier.
View attachment Garage Designing using PowerPoint.pdf
Having decided on the basic plan, I needed to raid the QM’s store. In the early phases, it was all about ScrewFix, ToolStation and B&Q. For specialist hardware I later referred to CS, FC and a few other places, but I assure you it was all both inexpensive and doable. It really was.
Initial Plan & Priorities:
1. The floor was cracked, raw concrete, badly unlevel (+10cm drop across a 12m x 5m surface area) and the main source of dust
2. The walls needed something doing to them, and a slap of paint seemed like the easiest route (plastering wouldn’t adhere to the timber)
3. I wanted to relocate the sole IP-rated twin socket, potentially adding more (for the Building Regs ****s: my qualifications in this area comprise of several months as a teenager trolling around building sites asking for striped paint, left-handed screwdrivers, long weights etc., so don’t panic – I had it all under control)
4. Lighting was my real area of expertise, having previously served under several Sparks (see above), and having all the right equipment: wellies, a keen eye for coloured wires and an innate ability to let my 75-year old, ex-electrical engineer father do the worrying for me (I swear he thinks I’m stupid).
Having established my plan, I set off for ScrewFix, ToolStation and B&Q. Once the Q7 was loaded up, I had an epiphany, but first let me explain what I bought, which then led to my inspired decision:
1. Bauker random orbital sander: £40, plus about £10 for pads and paper
2. Bauker nail gun: £30
3. Titan Wet’n’Dry vac: £40
4. MacAllister belt sander: £50, plus about £15 for paper etc.
5. 10 x 20kg bags of NX 3-50mm self-levelling floor compound: £190
6. Drill-mounted concrete stirring thing (trust me, you need one), plus 2 x 20L buckets: £20
7. Concrete bobbled roller: £20
8. Screwfix JSP Tradesman 2 28 Day Half Mask A1-P2: £10.83
9. DeWalt Concealer Premium Safety Goggles: £8.33
10. 3 x heavy duty gloves (1 ea x plastic, leather and cotton): £15
11. Huge concrete trowel: £25
Now I was, £500 lighter, with a car filled with man stuff and a very excited dog (recently promoted to the passenger seat of the Q7).
Evolving Plan (v1.0): Walls
I got distracted whilst passing the local timber merchant on the way home. I needed wood! I’d decided that painting the timber interior was going to look sh*t. So after completely perplexing the timber bloke with rough approximations and questions like: “…I wonder if I could wallpaper it…?”, I left with a £230 invoice for 10 sheets of 11mm OSB (2400mm x 1200mm), 36m of contract grade 50mm x 50mm planed timber and 5 x Appleby 2G 35mm Dry Lining Boxes (sockets). Trust me – that was a steal because post-COVID materials are twice that price. They said they would deliver within 2 hours, leaving me just enough time to secure virtual loyalty points at my favourite web site . Every cloud…
Now I was £750 light (give or take), and I still hadn’t done anything! But after a couple of hours of well-earned downtime, I received the huge lorry-load of timber, and got to work…
Making My Wood Work:
I marked out the windows I was adding, and started shoving up base boards, vertical studs and noggins. I slapped on extra heavy duty support (big wood) on both sides of the aperture for the windows – the roof falling in would make me feel silly.

I also nailed up some 3-core & earth that would be over-compliant with external wiring regs (it being under a covered roof). Technically, I went overboard on the compliance aspects, but wiring isn’t an area in which to cut corners. Things go bang at the wrong times when people do that.

Then I got busy strengthening areas that might benefit (note: this window was already there).

Seriously, I did all of this in an afternoon, so don’t imagine it’s weeks’-worth of labour, because it’s not.
Next day I got stuck into the OSB. I have to say, moving this stuff around wasn’t easy on my own, especially with a few holes in me, but once you’ve got it up, it’s easy to manoeuvre your tools and just start nailing. Or you can screw, if that’s your preference.

And here’s the result of one halfway competent DIY bloke’s work, 48 hours later. I left the weeds in the picture, just to prove to myself that I wasn’t being obsessive.

Next day I set to with my man tools. Thus far all I’d done was nail (which frankly, wasn’t half as exciting as I’d hoped), so it was time to the break out the belt and run it over the wood.

View attachment 156780

Who knew, right? Hardwood, softwood – makes no difference – bring your belt out, and it shows all the beauty. It started small, but as it grew, I couldn’t help but smile at the impact it was having.

By the time I’d finished the backdrop and exposed wood supports, I think I was about 5 days in – all told. I used the orbital sander with high grade sandpaper to get a super smooth finish, although in retrospect that was overkill; no-one’s run their hand over my wood for ages.
I then used inexpensive Leyland Primer on the walls. Note that because I didn’t use expensive marine-grade ply, instead opting for a much cheaper OSB, I had to give it 2 coats – but unless you want your walls as smooth as your wood – it will probably give you the effect you’re after. I didn’t paint it yet – I just wanted it sealed, so that the impending dust from the concrete wouldn’t sit in the cracks and prevent the paint from adhering to the surface.
I also chopped out the holes for my additional sockets (check your required fuse versus the cable and max. load your circuit could potentially hold, to comply with BRs).


End of part 1 :grin:
Background:
2 years ago I got into a minor contretemps whilst in East Africa, resulting in me being repatriated to the UK with a few lumps and bumps, and a head filled with PTSD. I decided to put the recuperation time to some semblance of good use. Here’s where I was storing 4 cars. It’s sacrilege, I know.
I took a few photos, loaded them into PowerPoint, and began playing around with colours, styles and ideas. I used Pinterest for inspiration, ScrewFix/ToolStation for encouragement and Club Scuderia for education. YouTube provided enough b/s to make me feel like I knew what I was doing, and Amazon reassured me it could help me buy everything I needed – apparently skill and experience were optional.
Just a suggestion, but here’s a really simple way to start ‘designing’ your garage using nothing more than your phone and PowerPoint. There are tools, stencils and templates out there, but they all failed me, and because I’m familiar with it, PowerPoint was just easier.
View attachment Garage Designing using PowerPoint.pdf
Having decided on the basic plan, I needed to raid the QM’s store. In the early phases, it was all about ScrewFix, ToolStation and B&Q. For specialist hardware I later referred to CS, FC and a few other places, but I assure you it was all both inexpensive and doable. It really was.
Initial Plan & Priorities:
1. The floor was cracked, raw concrete, badly unlevel (+10cm drop across a 12m x 5m surface area) and the main source of dust
2. The walls needed something doing to them, and a slap of paint seemed like the easiest route (plastering wouldn’t adhere to the timber)
3. I wanted to relocate the sole IP-rated twin socket, potentially adding more (for the Building Regs ****s: my qualifications in this area comprise of several months as a teenager trolling around building sites asking for striped paint, left-handed screwdrivers, long weights etc., so don’t panic – I had it all under control)
4. Lighting was my real area of expertise, having previously served under several Sparks (see above), and having all the right equipment: wellies, a keen eye for coloured wires and an innate ability to let my 75-year old, ex-electrical engineer father do the worrying for me (I swear he thinks I’m stupid).
Having established my plan, I set off for ScrewFix, ToolStation and B&Q. Once the Q7 was loaded up, I had an epiphany, but first let me explain what I bought, which then led to my inspired decision:
1. Bauker random orbital sander: £40, plus about £10 for pads and paper
2. Bauker nail gun: £30
3. Titan Wet’n’Dry vac: £40
4. MacAllister belt sander: £50, plus about £15 for paper etc.
5. 10 x 20kg bags of NX 3-50mm self-levelling floor compound: £190
6. Drill-mounted concrete stirring thing (trust me, you need one), plus 2 x 20L buckets: £20
7. Concrete bobbled roller: £20
8. Screwfix JSP Tradesman 2 28 Day Half Mask A1-P2: £10.83
9. DeWalt Concealer Premium Safety Goggles: £8.33
10. 3 x heavy duty gloves (1 ea x plastic, leather and cotton): £15
11. Huge concrete trowel: £25
Now I was, £500 lighter, with a car filled with man stuff and a very excited dog (recently promoted to the passenger seat of the Q7).
Evolving Plan (v1.0): Walls
I got distracted whilst passing the local timber merchant on the way home. I needed wood!
I’d decided that painting the timber interior was going to look sh*t. So after completely perplexing the timber bloke with rough approximations and questions like: “…I wonder if I could wallpaper it…?”, I left with a £230 invoice for 10 sheets of 11mm OSB (2400mm x 1200mm), 36m of contract grade 50mm x 50mm planed timber and 5 x Appleby 2G 35mm Dry Lining Boxes (sockets). Trust me – that was a steal because post-COVID materials are twice that price. They said they would deliver within 2 hours, leaving me just enough time to secure virtual loyalty points at my favourite web site . Every cloud…Now I was £750 light (give or take), and I still hadn’t done anything! But after a couple of hours of well-earned downtime, I received the huge lorry-load of timber, and got to work…
Making My Wood Work:
I marked out the windows I was adding, and started shoving up base boards, vertical studs and noggins. I slapped on extra heavy duty support (big wood) on both sides of the aperture for the windows – the roof falling in would make me feel silly.
I also nailed up some 3-core & earth that would be over-compliant with external wiring regs (it being under a covered roof). Technically, I went overboard on the compliance aspects, but wiring isn’t an area in which to cut corners. Things go bang at the wrong times when people do that.
Then I got busy strengthening areas that might benefit (note: this window was already there).
Seriously, I did all of this in an afternoon, so don’t imagine it’s weeks’-worth of labour, because it’s not.
Next day I got stuck into the OSB. I have to say, moving this stuff around wasn’t easy on my own, especially with a few holes in me, but once you’ve got it up, it’s easy to manoeuvre your tools and just start nailing
. Or you can screw, if that’s your preference.And here’s the result of one halfway competent DIY bloke’s work, 48 hours later. I left the weeds in the picture, just to prove to myself that I wasn’t being obsessive
.Next day I set to with my man tools. Thus far all I’d done was nail (which frankly, wasn’t half as exciting as I’d hoped), so it was time to the break out the belt and run it over the wood.
View attachment 156780
Who knew, right? Hardwood, softwood – makes no difference – bring your belt out, and it shows all the beauty. It started small, but as it grew, I couldn’t help but smile at the impact it was having.
By the time I’d finished the backdrop and exposed wood supports, I think I was about 5 days in – all told. I used the orbital sander with high grade sandpaper to get a super smooth finish, although in retrospect that was overkill; no-one’s run their hand over my wood for ages.
I then used inexpensive Leyland Primer on the walls. Note that because I didn’t use expensive marine-grade ply, instead opting for a much cheaper OSB, I had to give it 2 coats – but unless you want your walls as smooth as your wood – it will probably give you the effect you’re after. I didn’t paint it yet – I just wanted it sealed, so that the impending dust from the concrete wouldn’t sit in the cracks and prevent the paint from adhering to the surface.
I also chopped out the holes for my additional sockets (check your required fuse versus the cable and max. load your circuit could potentially hold, to comply with BRs).
End of part 1 :grin:


")