Club Scuderia
-
Please take a minute to read this thread about our recent server issues and forum platform Switch
You are using an out of date browser. It may not display this or other websites correctly.
You should upgrade or use an alternative browser.
You should upgrade or use an alternative browser.
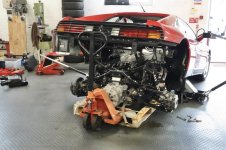
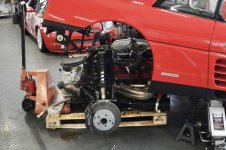
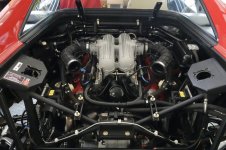
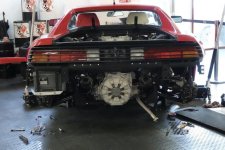
Ferrari 348 engine bay and rear end restoration.
- Thread starter Pangea
- Start date
Pangea
Active member
Looks ike new")
Cheers Jeff.. Previous work is holding up well...
Mike01606
Active member
Looks ike new
Looks better than new [emoji3]
Sent from my iPhone using Tapatalk
Pangea
Active member
Looks better than new [emoji3]
Sent from my iPhone using Tapatalk
Cheers Mike.


irarref
Active member
Hi Nick
When your lowering the jacks down do you do it by yourself swapping from side to side or have a mate lowering the other side so it goes down straight? Always curious about how the jack method works with regard to lining the cradle up to the main body accurately???
ALso, whats the electrical lead just by the asbestos badge? Is it an extra earth as I dont have that.
Pangea
Active member
Hi Nick
When your lowering the jacks down do you do it by yourself swapping from side to side or have a mate lowering the other side so it goes down straight? Always curious about how the jack method works with regard to lining the cradle up to the main body accurately???
ALso, whats the electrical lead just by the asbestos badge? Is it an extra earth as I dont have that.
Hi Jeff,
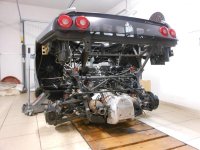
I can do the jack thing on my own. Little bit at a time. I use a plum bob to align the cradle, hanging it off one of the main mounting bolts. Temporary fitted. Lining the string up with the centre of the respective subframe bolt hole. When down almost into position I remove the bolt and string from the body. You can jiggle the whole load around with the pallet truck until its in a good forward position. This time I ended up removing the rear shockers as it made for easier fitting. There is not a lot of clearance when coming down at that angle and the studs can catch the body frame section. Maybe the only real hang up with this method. Takes a bit more time but hey...Even the factory had problems installing these units, quite often modifying the four mounting holes then fitting larger washers to cover. I believe this led to the cars from 92ish on having the modified top mount area.
Compare the pic below with mine. Notice the two extra alternative securing studs and nuts. Also they squared of the large hole where the shocker top comes through avoiding using the four studs. This mod could be retro fitted easily. Just need the alternative mounting plate and some careful grinding and drilling. I can imagine there was a lot of cussing when the first cars needed engine out services....
I fitted an extra earth to the body frame. I noticed I had an engine surge when the cooling fans kicked in. Made a big difference. I proved the point with a jump lead first.

ronrob
Member
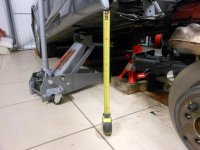
If of interest, here are a couple of photos of the two jack method used on my 355. It's easier for me, as I have a pit to gain access to the two sets of 6 19" bolts that hold the two plates to the bulkhead. Avoiding cross threading of these bolts on re-assembly is rather nailbiting. I have performed this operation four times now and I can almost take photos without camera shake. As Nick says, it's perfectly possible to lower a bit at a time from each side. To be honest, I don't know if I would trust somebody else to lower at the same rate anyway! In any case, you do it a few millimetres at a time, with tripod stands in place just in case......
Thanks to the dimensions given by Terry many moons ago, I use the lowest possible trolley to minimise the height to which the car must be raised - see photo with tape measure extended.
If I may extend a message to Nick. I have had so much pleasure following your fabulous work with your patience and attention to detail. Many people will not understand the commitment to such a level........but many of us do. Congratulations Nick. It's a pity that we cannot all be there for the start up!
Attachments
Pangea
Active member
Cheers Nick - I did notice your shocks were missing but just assumed you were doing something to your suspension.
I think getting the engine back in is the part I'm most concerned about as you do read horror stories of people struggling to get everything aligned.
Not the easiest engine fit for sure. Its a big, heavy unit to move around. It would be easier lifting the car in a perfectly horizontal position with a ramp onto a purpose built trolley as you would have better clearances but if you want it out over a long period to do other things and not block up a busy area of workshop this does for me.
Of course you have to feed the looms through the bulkhead and engage the coolant hoses as you come down with the body. All a bit tricky but not the end of the world....:thumbsup:
Pangea
Active member
If of interest, here are a couple of photos of the two jack method used on my 355. It's easier for me, as I have a pit to gain access to the two sets of 6 19" bolts that hold the two plates to the bulkhead. Avoiding cross threading of these bolts on re-assembly is rather nailbiting. I have performed this operation four times now and I can almost take photos without camera shake. As Nick says, it's perfectly possible to lower a bit at a time from each side. To be honest, I don't know if I would trust somebody else to lower at the same rate anyway! In any case, you do it a few millimetres at a time, with tripod stands in place just in case......
Thanks to the dimensions given by Terry many moons ago, I use the lowest possible trolley to minimise the height to which the car must be raised - see photo with tape measure extended.
If I may extend a message to Nick. I have had so much pleasure following your fabulous work with your patience and attention to detail. Many people will not understand the commitment to such a level........but many of us do. Congratulations Nick. It's a pity that we cannot all be there for the start up!
Thank you Ron. Kind words indeed. Happy you enjoy the thread... Im sure we all try and do our best.
I do utilise a ramp at first to undo and strip off covers, cables, drain fluids etc etc. Anything that would be awkward on the floor. Then again to finish off the job for cables etc. Much easier.
I agree in keeping the assembly as low as possible. One strong pallet hight seem to work for me. With the pallet truck I only need to lift it 5-10mm to roll it out.. It is a nervous time jacking the car up that high for sure. Much happier when its sat back on stands...
By the way Ron it sounded sweet from the start up. All primed up first.. :thumbsup:
Pangea
Active member
Great news regarding the start up Nick. A grand job, well rewarded!! Congratulations. Ron
:thumbsup:
Pangea
Active member
Couple of short vids..
Warm up idle from cold....https://youtu.be/XEs-NpzOJOE
Idling when hot....https://youtu.be/h6X2TBTR9oQ
Nice clean exhaust now the cats are refitted. Idling nicely. Relearning the ecus. Dont think its ever been this smooth. MOT passed without any issues.

Warm up idle from cold....https://youtu.be/XEs-NpzOJOE
Idling when hot....https://youtu.be/h6X2TBTR9oQ
Nice clean exhaust now the cats are refitted. Idling nicely. Relearning the ecus. Dont think its ever been this smooth. MOT passed without any issues.
Pangea
Active member
Work carried out 2022/23.
Remove engine and transmission to carry out service including…
Remove all brake pads clean and apply appropriate lubrication.
Inspect and restore all cam drive pulleys.
Remove and restore fuel tank including strip out fuel pumps for inspection.
Replace.
Remove all bulkhead fittings and replace heat protection sheeting. Cosmetic reasons…
New parts.
Cam belt.
Hills tensioner kit.
Tensioner carrier lock nuts and washers.
Water pump. Metal impeller type.
Cam belt cover kit and bolts.
Cam cover gaskets.
Phase sensor housing gaskets.
Rear cam cover gasket.
4 cam seals.
4 oils seal carrier O rings.
Crank seal. Front.
Engine build start up lubrication for cams and associated parts reassembly.
Plenum chamber acorn nuts.
Engine oil.
Oil filter.
Gear oil.
2 fuel filters.
8 Plugs.
Antifreeze.
Brake fluid.
Clutch fluid.
Brake pad lubrication grease. Brembo.
Air con drive belt.
Alternator drive belt.
Main fuel pump assy. O rings.
Copper washers for pump connectors. In tank.
Heat protection sheeting for bulkhead.
Engine subframe bolts and washers.
Engine sealer.


milkshaker0007
Active member
Great work:thumbsup: now to enjoy it !!!!!
Pangea
Active member
Great work:thumbsup: now to enjoy it !!!!!
Yes Paul...:thumbsup: